
There are many ways to enrol Windows devices into Intune, each works slightly differently and some work better than others depending on your situation. This post aims to run through each, how to use them and when to use them. We all know how often the Entra and Intune portals change so if you are hitting this page and things have moved, drop a message below and I’ll update!
- Pre-Reqs
- GPO
- Autopilot v1
- Autopilot Device prep
- Provisioning Package
- PowerShell Script
- Work or School
- Company Portal
- M365 Apps
- JSON Injection
Pre-Reqs
Let’s start with the pre-requisites before attempting any enrollments:
User licensing
Your users need to have an Intune license which can be found in (amongst others):
EMS E3, Business Premium, M365 E3, E5, A3, A5, F3, F5. This is a valuable resource for licensing: https://m365maps.com/
MDM Enrollment scopes
Within Entra, click “Show More”, Expand Settings and click Mobility:
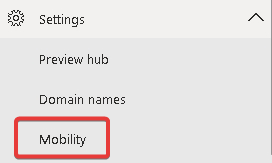
Click on Microsoft.Intune

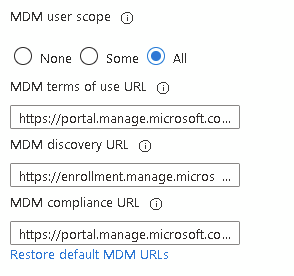
Make sure the MDM scope it set to either All, or Some and the group selected contains the users enrolling devices. If the boxes below are blank, click the restore text
You can also do this via Graph:
##Get policies
$policiesuri = "https://graph.microsoft.com/beta/policies/mobileDeviceManagementPolicies"
$policies = getallpagination -url $policiesuri
#$policies = (Invoke-RestMethod -Method GET -Uri $policiesuri -UseBasicParsing -Headers @{Authorization = "Bearer $($Tokenresponse.access_token)"}).value

##If only one, convert to array
if ($policies -isnot [System.Collections.ArrayList]) {
    $policies = @($policies)
}

foreach ($policy in $policies) {
    $policyid = $policy.Id
    $json = @"
    {
        "appliesTo":  "all"
    }
"@
    $uri = "https://graph.microsoft.com/beta/policies/mobileDeviceManagementPolicies/$policyid"
    Invoke-MgGraphRequest -Method PATCH -Uri $uri -Body $json -ContentType "application/json"
}
MDM is set to Intune
This is more for really old tenants, but worth checking. Sometimes the MDM is set to O365 so will block device enrollment. It’s an easy fix, but needs digging into Graph:
After connecting to Graph, this script will check the MDM provider and fix if needed:
write-output "Getting Organisation ID"
$OrgId = (Invoke-MgGraphRequest -Uri "https://graph.microsoft.com/v1.0/organization" -Method Get -OutputType PSObject).value.id
write-output "Org ID is $orgid"
    #Check if Intune already is MDM Authority
write-output "Checking if Intune is MDM"
 $mdmAuth = (Invoke-MgGraphRequest -Uri "https://graph.microsoft.com/beta/organization('$OrgId')?`$select=mobiledevicemanagementauthority" -Method Get -OutputType PSObject).mobileDeviceManagementAuthority
 #Sets Intune as MDM Authority if not already set
 write-output "MDMAuth is $mdmAuth"
 if($mdmAuth -notlike "intune")
  {
  write-output "Setting MDM org to Intune"
  Invoke-MgGraphRequest -Uri "https://graph.microsoft.com/v1.0/organization/$OrgID/setMobileDeviceManagementAuthority" -Method POST
 write-output "MDM set"
 }
Enrollment Restrictions
Within Intune, just check Corporate devices are allowed (and ideally block personal devices although that will break some options below):
Devices – Enrollment – Device Platform Restriction.
Edit the default All Users policy

Or via Graph:
Write-Output "Getting Device Restrictions Policy ID"
$policyid = (((Invoke-MgGraphRequest -Method GET -Uri "https://graph.microsoft.com/beta/deviceManagement/deviceEnrollmentConfigurations?`$filter=priority eq 0" -OutputType PSObject).value) | where-object '@odata.type' -eq "#microsoft.graph.deviceEnrollmentPlatformRestrictionsConfiguration").id
Write-Output "Policy ID: $policyid"

##Set URL
$url = "https://graph.microsoft.com/beta/deviceManagement/deviceEnrollmentConfigurations/$policyid"


##Populate JSON
$json = @"
{
	"@odata.type": "#microsoft.graph.deviceEnrollmentPlatformRestrictionsConfiguration",
	"androidForWorkRestriction": {
		"blockedManufacturers": [],
		"osMaximumVersion": "",
		"osMinimumVersion": "",
		"personalDeviceEnrollmentBlocked": true,
		"platformBlocked": false
	},
	"androidRestriction": {
		"blockedManufacturers": [],
		"osMaximumVersion": "",
		"osMinimumVersion": "",
		"personalDeviceEnrollmentBlocked": false,
		"platformBlocked": true
	},
	"macOSRestriction": {
		"blockedManufacturers": [],
		"osMaximumVersion": null,
		"osMinimumVersion": null,
		"personalDeviceEnrollmentBlocked": true,
		"platformBlocked": false
	},
	"windowsHomeSkuRestriction": {
		"blockedManufacturers": [],
		"osMaximumVersion": null,
		"osMinimumVersion": null,
		"personalDeviceEnrollmentBlocked": true,
		"platformBlocked": false
	},
	"windowsRestriction": {
		"blockedManufacturers": [],
		"osMaximumVersion": "",
		"osMinimumVersion": "",
		"personalDeviceEnrollmentBlocked": true,
		"platformBlocked": false
	}
}
"@

##Update Policy
write-output "Updating Device Restrictions Policy"
Invoke-MgGraphRequest -Uri $url -Method PATCH -Body $json -ContentType "application/json"
Write-Output "Device Restrictions Policy updated"
Now we can start looking at enrollment
GPO
If your devices are currently domain joined, this is the easiest way to get them into Intune (and Autopilot)
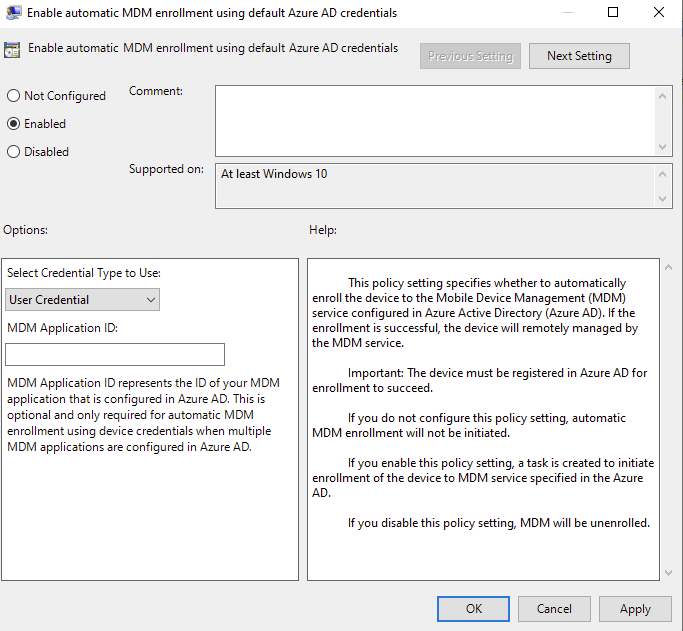
Simply create a new GPO and set this:
Computer Configuration > Administrative Templates > Windows Components > MDM > Enable automatic MDM enrollment using default Microsoft Entra credentials.
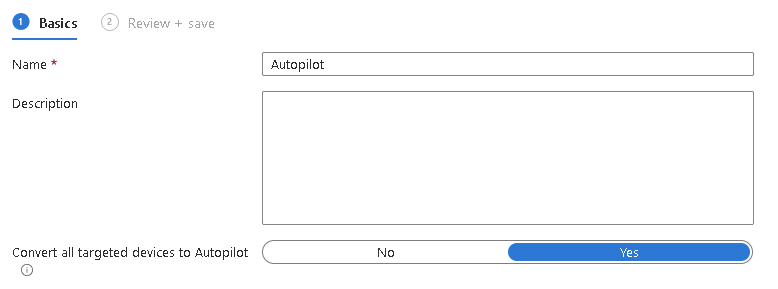
Convert Existing Devices
If you also want these devices to show in Autopilot Devices, in your Autopilot Profile, assign to all devices and set “Convert all targeted devices to Autopilot” to Yes:
This method adds devices to Intune and Autopilot but doesn’t give them admin rights or anything unusual. I usually suggest creating an OU with Inheritence Disabled to avoid any clashes between GPOs and Intune Policies.
More importantly, no device wipe is needed.
Further info: https://learn.microsoft.com/en-us/windows/client-management/enroll-a-windows-10-device-automatically-using-group-policy
Autopilot – Online and CSV
This is probably the most used approach to enrol devices into Intune via Autopilot during OOBE and is done by enrolling the device hash into the Autopilot service. Then when the device is wiped, during OOBE, it checks in and applies Intune policies etc. as per your ESP.
Starting with the quicker online method, this can be run either interactively, or if your enrolling staff do not have permissions, can be used with an Entra App reg:
set-executionpolicy Unrestricted
install-script get-windowsautopilotinfocommunity

get-windowsautopilotinfocommunity.ps1 -online -tenantID xxx -AppID xxx -AppSecret xxx
Optionally you can add “-assign” to wait for assignment to complete and “-sysprep” to kick off a sysprep and re-enrol when complete (amongst other option)
Alternatively, you can run the script to extract the hash into CSV format to then add manually into Autopilot:
set-executionpolicy Unrestricted
install-script get-windowsautopilotinfocommunity

get-windowsautopilotinfocommunity.ps1 -outputfile c:\temp\autopilot.csv
In Intune, navigate to Devices – Enrollment – Autopilot Devices

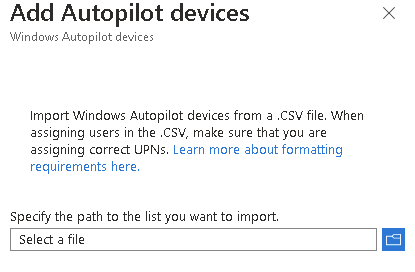
Click Import
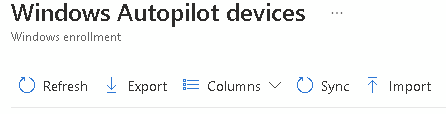
Upload the CSV file
This is an excellent way to add new devices, or rebuild existing devices to cloud native Entra Joined. You have full control over the device and it follows your profile and ESP.
If you want an Entra group to target Autopilot enrolled devices, use this device query:
(device.devicePhysicalIDs -any (_ -startswith "[ZTDid]"))Further information:
https://learn.microsoft.com/en-us/autopilot/add-devices
Autopilot Device Prep
Known in the community as Autopilot v2, it makes the enrollment easier for the user, but is a little more tricky to configure.
NOTE: If a device is enrolled into Autopilot with device hash (or convert existing devices), this will win over Device Prep so you’ll need to remove the device from Autopilot Devices first.
The first thing we need to do is create an Entra group with a specific application set as the owner. This is what Autopilot users to populate devices into the group (no more ztid dynamic group needed)
Create a new static assigned group with whatever name you choose:

Click Owners
Search for this ID: “f1346770-5b25-470b-88bd-d5744ab7952c” which should find “Intune Autopilot ConfidentialClient”:
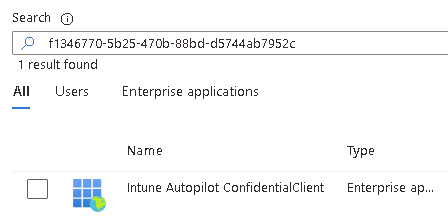
If it doesn’t, run this script:
$spid = "f1346770-5b25-470b-88bd-d5744ab7952c"
write-output "Checking if Enterprise App exists"
$lookforsp = get-mgserviceprincipal -filter "AppID eq '$spid'"

if (!$lookforsp) {
    write-output "Enterprise App does not exist, creating"
    $ServicePrincipalId = @{
        "AppId" = "$spid"
    }
   $appregid = New-MgServicePrincipal -BodyParameter $ServicePrincipalId
    write-output "Enterprise App created"
}
We also need a second User group which allows users to enrol devices. This can be static or dynamic and called anything as long as it is a user group as it’s pre-device.
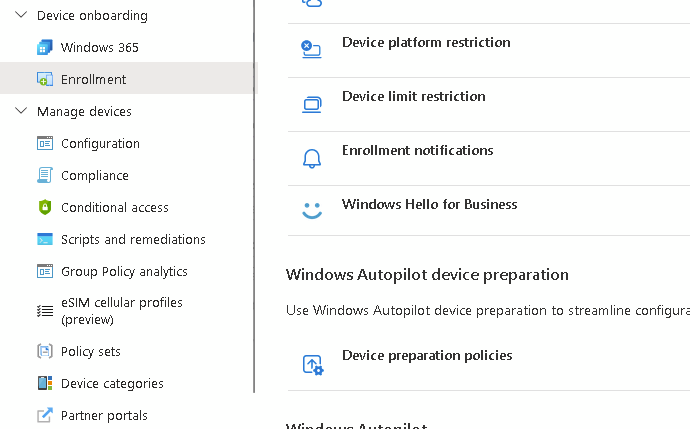
Now in Intune click Devices – Enrollment – Device Preparation Policies
Create a new profile and after filling in the basic details, select the device group we created earlier (with the owner)
The Configuration Settings are the new ESP, set which scripts and apps MUST be available before a user logs in and any other required settings (please don’t make them admins)
When you reach assignments, select the user group created which holds the users allowed to enrol.
Technically this is all you need BUT you will need to allow Personal Device enrollment which is always risky. Therefore, we can add device details so Autopilot knows it’s a corporate device, similar to the hash, but simpler.
We can grab the details with a one-liner and output to a CSV (source)
(Get-CimInstance Win32_ComputerSystem).Manufacturer+','+(Get-CimInstance Win32_ComputerSystem).Model+','+(Get-CimInstance Win32_BIOS).SerialNumberOr you can use the same script as for v1 and either add directly online, or export to csv:
set-executionpolicy Unrestricted
install-script get-windowsautopilotinfocommunity

get-windowsautopilotinfocommunity.ps1 -online -identifier
Offline:
set-executionpolicy Unrestricted
install-script get-windowsautopilotinfocommunity

get-windowsautopilotinfocommunity.ps1 -identifier -outputfile c:\temp\device.csv
Then in the Intune portal, navigate to Devices – Enrollment and click the Corporate Device Identifiers tab:

Click Add – Upload CSV file and in the drop-down select “Manufacturer, Model and Serial number (windows only)”
That’s it, now simply enrol via OOBE and away you go.
There are currently some limitations though to device prep:
- Windows 11 only
- Entra ID join only (not a bad thing)
- No pre-provisioning
- No kiosk style self-deployment
- No grouptags
More info:
https://learn.microsoft.com/en-us/autopilot/device-preparation/overview
Provisioning Package
What about a non-domain joined device where you don’t want to wipe and reload? There are some options for that, they aren’t quite as fluid, but they are still an option.
The first is to deploy a provisioning package to devices. For this you will need Windows Configuration Designer from the ADK to create a package.
Rather than re-write the whole process, there is an end-to-end process here:
It’s worth noting that an administrator will need to run the package on each machine so it will need some effort on the IT side and if they had admin rights before, they will still have them afterwards (you can remove with an Intune policy). You’re obviously also inheriting any of the previous rubbish left on the device. It works in a pinch, but isn’t ideal.
As with GPO, you will probably then want to convert these to Autopilot devices so you don’t have to do this again.
PS Script
If you have RMM access to these devices, you can deploy a PowerShell script to enrol them into Intune.
Fortunately Rudy has saved me a job here and written a selection of scripts which you can find here:
Running this script in the system context will sort the enrollment:
# Set MDM Enrollment URL's
$key = 'SYSTEM\CurrentControlSet\Control\CloudDomainJoin\TenantInfo\*'

try{
    $keyinfo = Get-Item "HKLM:\$key"
}
catch{
    Write-Host "Tenant ID is not found!"
    exit 1001
}

$url = $keyinfo.name
$url = $url.Split("\")[-1]
$path = "HKLM:\SYSTEM\CurrentControlSet\Control\CloudDomainJoin\TenantInfo\$url"
if(!(Test-Path $path)){
    Write-Host "KEY $path not found!"
    exit 1001
}else{
    try{
        Get-ItemProperty $path -Name MdmEnrollmentUrl
    }
    catch{
        Write_Host "MDM Enrollment registry keys not found. Registering now..."
        New-ItemProperty -LiteralPath $path -Name 'MdmEnrollmentUrl' -Value 'https://enrollment.manage.microsoft.com/enrollmentserver/discovery.svc' -PropertyType String -Force -ea SilentlyContinue;
        New-ItemProperty -LiteralPath $path -Name 'MdmTermsOfUseUrl' -Value 'https://portal.manage.microsoft.com/TermsofUse.aspx' -PropertyType String -Force -ea SilentlyContinue;
        New-ItemProperty -LiteralPath $path -Name 'MdmComplianceUrl' -Value 'https://portal.manage.microsoft.com/?portalAction=Compliance' -PropertyType String -Force -ea SilentlyContinue;
    }
    finally{
    # Trigger AutoEnroll with the deviceenroller
        try{
            C:\Windows\system32\deviceenroller.exe /c /AutoEnrollMDM
            Write-Host "Device is performing the MDM enrollment!"
           exit 0
        }
        catch{
            Write-Host "Something went wrong (C:\Windows\system32\deviceenroller.exe)"
           exit 1001
        }

    }
}
exit 0
The same catches apply as with the provisioning package, it isn’t a clean build and you need to watch for any lingering admin rights. The devices will also need to already be listed in Entra, but that usually happens when they sign into M365 apps.
Work or School
Users can navigate to Settings – Accounts – Access Work or School – Connect
It technically works, but devices will be registered as personal and if you have that blocked your users will get this error:

Not to mention expecting your users to fill in the settings properly…
Probably best avoided
Company Portal
For this you’ll need to somehow deploy the Company Portal MS Store app, tell the users to sign in and make sure this box is ticked:
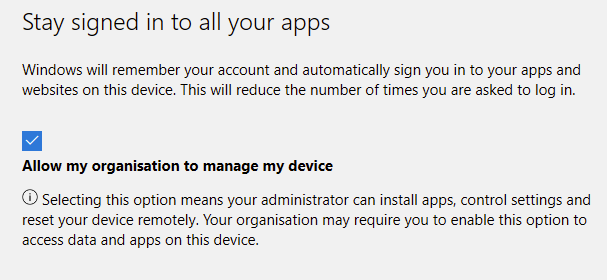
As with the method above, you will need Personal Devices enabled and they will enrol as personal and not corporate so you’ll need to change them within Intune. They’ll also retain admin settings and anything else on the device.
When signing into M365 apps
When signing into M365 apps, your users could tick the box to Allow my organisation to manage my device (the same as when installing company portal), but the same applies, you’ll need to unblock personal device enrollment which means they could sign in to these apps from any device and enrol into the tenant.
I’ve looked at these options here:
JSON
This used to be an excellent approach for use with MDT or SCCM. You could create a JSON containing the Autopilot details and inject during the task sequence which would add the device for you automatically.
Sadly it was discovered that anyone could easily create the JSON and enrol non-managed devices into a tenant so to avoid this issue, to use JSON injection you need to allow Personal Devices to be enrolled. It isn’t ideal, but it does still work.
To generate the JSON use this command:
$graphApiVersion = "beta"
$Resource = "deviceManagement/windowsAutopilotDeploymentProfiles"

$uri = "https://graph.microsoft.com/$graphApiVersion/$Resource"
$response = Invoke-MGGraphRequest -Uri $uri -Method Get -OutputType PSObject

    $profiles = $response.value

    $profilesNextLink = $response."@odata.nextLink"

    while ($null -ne $profilesNextLink) {
        $profilesResponse = (Invoke-MGGraphRequest -Uri $profilesNextLink -Method Get -outputType PSObject)
        $profilesNextLink = $profilesResponse."@odata.nextLink"
        $profiles += $profilesResponse.value
    }

    $selectedprofile = $profiles | out-gridview -passthru -title "Select a profile"
Make a note of the ID and export it with this:
        $graphApiVersion = "beta"
    $Resource = "deviceManagement/windowsAutopilotDeploymentProfiles"

$uri = "https://graph.microsoft.com/$graphApiVersion/$Resource/$id"
$approfile = Invoke-MGGraphRequest -Uri $uri -Method Get -OutputType PSObject
I have a tool here to automatically create an ISO with the JSON injected:
You can also use the excellent OSDCloud for this:
More information:
https://learn.microsoft.com/en-us/autopilot/existing-devices
Conclusion
There is no “best” approach, it is whatever suits your environment. Ideally a fresh start with Autopilot (v1 or 2), but if that isn’t an option, GPO or PS Script depending on domain join status are perfectly acceptable options.
Hopefully this has been useful, if I’ve missed anything, add it in the comments below
I am having some trouble. Devices are domain joined and showing as entra registered. Ive tried the GPO and even manually it fails to run. Is there any other way to get devices in to Intune? Or things to look at? I have worked with Microsoft extensively and they have not been able to figure it other than state the dsregcmd status for AZprt is set to no and needs to be yes. The gpo is using user credentials as well.
Is there anything in the event log on the device trying to GPO enrol?
Is the MDM scope set correctly and the MDM set to Intune?
Users licensed correctly?
Does the steps here apply to hybrid-join. This has been a very difficult project. To get devices hybrid-joined, many I had to wipe the OS. Many are hybrid-joined but not enrolled in intune. I have followed many of the steps above but on some devices, it is a no go!
Yes, GPO is for hybrid joined.
If you mean hybrid autopilot, no, I avoid that, it’s a terrible idea
Hey Andrew. Thanks for the helpful information.
We are planning on shipping Entra registered/domain joined devices to users and allowing them to enroll the devices into Intune with their Entra credentials (using the GPO). In testing, we’re encountering an issue enrolling the devices into Intune because of MFA. Basically we’re having to go into the Windows account settings and “fix our account” to manually make the MFA prompt appear. Once the user gets past the MFA prompt successfully the device will enroll into Intune when the task created by the GPO runs again. This isn’t really seamless and requires some work for the end user. If MFA is disabled, the device enrolls into Intune when the user signs in and/or when the enrollment task runs next.
I see this error in for the scheduled task: Task last run result: 0x8018002A.
I also see these errors in Event Viewer:
Warning – Auto MDM Enroll DmRaiseToastNotificationAndWait Failure (Unknown Win32 Error code: 0x8018002a)
Informational – Auto MDM Enroll Get AAD Token: Device Credential (0x0), Resource URL (https://enrollment.manage.microsoft.com/), Resource Url 2 (NULL), Status (Unknown Win32 Error code: 0x8018002a)
Error – Auto MDM Enroll: Device Credential (0x0), Failed (Unknown Win32 Error code: 0x8018002a)
Does fixing this require a change in MFA policy? If so, are you familiar with the specifics?
Hi Jake,
Is the GPO set to enrol with users credentials? The error seems to be looking at device credentials
We have the “Enable automatic MDM enrollment using default Azure AD credentials” GPO enabled but I just now noticed that we don’t have the option “Select Credential Type to Use” visible at all to choose an option like you have in your screenshot. The GPO is just enabled and there’s nothing else available to configure. The GPO is here just like you have in your post above: Computer Configuration > Administrative Templates > Windows Components > MDM > Enable automatic MDM enrollment using default Microsoft Entra credentials. Odd.
Hi Thank you for your Documentation. We have an Cloud Native M365 environment and devices that are entra joined but not Intune joined. We have no RMM tool. Since It’s like 30 Devices I don’t mind doing it manually in a way without reseting the OS and keep all files and settings. I tryed the approach with Company Portal, but company portal always giving an error that something went wrong. Any “best practices” or recommended approaches?
PS: Intune is setup as MDM for all users
If they are Entra joined already, I would just grab the PowerShell script from Rudy and run that as admin on each of the devices. That should sort it and retain it as a company device
Awesome work on this and so much great info here!!!
I can’t believe Microsoft doesn’t have a button in settings that would easily register computers with Autopilot! Why do they make this so difficult?!
This blog would be really light on content if they made it too easy 🙂
Hi Andrew, similar to the comment from user HP. the difference is what we have. How can I bring existing devices (not connected to company network/GPO) to Intune without VPN? and how can I do this with autopilot (for future autopilot reset) without resetting the system?
Hi,
Without GPO, if you have some RMM tools, I would go with Rudy’s PowerShell script. Once you have your devices in Intune, set your Autopilot profile to convert existing devices and that will make them Autopilot devices for future resets.
thank you for your fast reply. but we dont have rmm-tools. — another question. i have a test device that is shown under “windows autopilot devices” with the serial number and it is “assigned” to a profile. ok but how do i bring the device into the intune administration? in entra it is shown as autopilot (icon) and entra joined status.. i’m so confused sorry
Devices showing in Autopilot won’t automatically be Intune managed, to use Autopilot, you would need to wipe them.
Without an RMM your options are limited, it’s either going to need a visit to each device to enrol with PowerShell, or a device wipe combined with either device hash addition, or using Autopilot Device prep.
You could technically enrol using Company Portal, but that would be a personal device so does lack some functionality and isn’t ideal
Hi Andrew,
I hope you are doing well. This is one of the easy-to-follow write-ups. Thanks for this.
I need to enroll our devices into Intune, which are already registered in Entra ID (Azure AD) and are part of our on-premises AD. The challenge is to do this without requiring administrative rights from the users. Is there any technique that will work for such a scenario?
Thank you
Hi, GPO enrollment is your best option for existing devices and it’s very straight forward as well. Let me know if you get stuck configuring it
Hi Andrew,
we are facing the same challenge at the moment. All devices are available in Entra. Entra ID Sync is working. I have setup a GPO provisioning the SCP to all devices as well as setting the automatic mdm registration to “user credentials”. But still the devices will not show in Intune. Any idea how to proceed?
Hi,
Check your Entra MDM scopes and Intune restrictions. Make sure users are correctly licensed. Also check both the event logs on the device and the Entra sign-in logs, it could be MFA getting in the way
Dear Andrew,
I hope this message finds you well.
I am planning to use a bootable USB containing a clean installation of Windows 11 Pro. My objective is to utilize this USB for reimaging both existing and new devices, ensuring they are enrolled in Intune and assigned an AutoPilot profile during the process.
Could you please guide me on the necessary steps or configurations to achieve this seamlessly? Your assistance in ensuring that the devices are properly enrolled and have the appropriate profiles assigned would be greatly appreciated.
Thank you in advance for your support.
Hi Ramesh,
I would probably look at OSDCloud for something like that and inject the JSON (you’ll have to allow personal enrollment though)
Hi Andrews. I’m new to Intune and wondering if you could explain this point about loading the hardware hash online. My users are not tech sawvy and just wondering if there’s a way this process could be integrated into the deployment so that all they have to do is to authenticate with their credentials and the process continues. Is that what these statements seek to accomplish?
“Starting with the quicker online method, this can be run either interactively, or if your enrolling staff do not have permissions, can be used with an Entra App reg:
set-executionpolicy Unrestricted
install-script get-windowsautopilotinfocommunity
get-windowsautopilotinfocommunity.ps1 -online -tenantID xxx -AppID xxx -AppSecret xxx
Optionally you can add “-assign” to wait for assignment to complete and “-sysprep” to kick off a sysprep and re-enrol when complete (amongst other option)
Hi, I wouldn’t give users access to the app reg, that step is normally done by IT, or get the vendor to enrol them for you. If you want the users to do it all themselves, I would look at using Autopilot Device Prep
Hi Andrew, thanks for the great write-up. My question is, in a hybrid scenario, where a GP is used to auto-enrol into Intune and Autopilot, with inheritance disabled, should inheritance be enabled again after the devices are successfully enrolled? If not how would the devices get GPs? Does it mean that those devices would no longer be using GPs?
Hi,
Once enrolled into Intune, you let that handle device config and stop using GPO
Thanks
Hi Andrew, I hope you’re doing well. I’ve been troubleshooting an issue with Autopilot and can’t seem to identify the root cause. Here’s what’s happening:
When I enroll devices using Autopilot, they show up in Intune with management status as Not Available, and they don’t appear under MDM or in Defender.
However, when I domain join devices manually (without using Autopilot), they show up as MDM enrolled and are visible in Defender.
I’ve already checked the following:
In the Microsoft Intune portal, MDM user scope is set to All.
Devices are Azure AD joined successfully.
Autopilot profiles are configured correctly and assigned to the devices.
It seems like something is failing during the Autopilot deployment process that prevents proper MDM enrollment or management status updates.
Could you help me identify what I might be missing here? Thank you for your guidance!
Hi,
A few things to check:
1) In Entra portal, check the MDM is set to Intune and allowed for either everyone or a group with your users in
2) In Intune, go to Tenant Administration and check the MDM authority is set to Intune
3) In Intune – Troubleshooting. Select a user and check for anything obvious there
4) Check the device is in Devices – Enrollment – Devices with the correct Autopilot profile applied
I’m assuming Entra joined and not hybrid as well
GPO with co-management. Should this be user or device credential?
You want user credentials for those if they are standard one user per device
What is the pros of Autopilot v2?
The main one is you don’t need to harvest the hash so users could go and grab any machine and just tell you the serial etc. which are normally printed on the boxes themselves
I second this. During the OOBE the user just presses cntrl + shift + D and the serial Number, manufacturer and model is all presented for them to pass to the IT manager to update Intune corporate identifiers. Just performed this process today, for an employee and it worked.
Unfortunately, I had to also add the steps of upgrading to win 11 pro and updating via the CMD line before it could work. but should be less of an issue as device prep becomes more mainstream and assuming they buy laptops already set to win 11 pro or above.