
With the release of Winget, we now have another app deployment method which works nicely with Intune.
At the moment building a custom Winget repo is not an easy task, but you can deploy using a custom manifest.
This blog post will cover how to use a custom manifest stored online to deploy an application and then using a runbook
The first thing to note is that a custom manifest has to be local, either on the machine itself, or on a network drive. Therefore we’ll grab the file and store it locally
The scripts I’m using are here: https://github.com/andrew-s-taylor/public/tree/main/Powershell%20Scripts/Winget
If you want to grab some manifests to test, the official repo is here: https://github.com/microsoft/winget-pkgs/tree/master/manifests
If we use Chrome as an example, most manifests will include 3 files, an installer, a locale and an app one, we need to get all 3
Update 12/11/21 – Thanks to the excellent work of Phil Jorgensen this can now run in the System Context which removes the admin rights requirement
Update 12/07/22 – Updated Winget.exe to replace old AppCLI one
First up, create a temp folder for the files to live in (I’ve opted for a random with the date):
$directory = $env:TEMP
#Create Temp location
$random = Get-Random -Maximum 1000
$random = $random.ToString()
$date =get-date -format yyMMddmmss
$date = $date.ToString()
$path2 = $random + "-"  + $date
$path = $directory + "\" + $path2 + "\"
new-item -ItemType Directory -Path $path
Now specify the filenames to use:
##File Name
$templateFilePathinstaller = $path + "chrome.installer.yaml"
$templateFilePathlocale = $path + "chrome.locale.yaml"
$templateFilePathversion = $path + "chrome.yaml"
Then download them:
Invoke-WebRequest `
   -Uri "https://raw.githubusercontent.com/andrew-s-taylor/winget/main/manifests/g/Google/Chrome/92.0.4515.107/Google.Chrome.installer.yaml" `
   -OutFile $templateFilePathinstaller `
   -UseBasicParsing `
   -Headers @{"Cache-Control"="no-cache"}


   Invoke-WebRequest `
   -Uri "https://raw.githubusercontent.com/andrew-s-taylor/winget/main/manifests/g/Google/Chrome/92.0.4515.107/Google.Chrome.locale.en-US.yaml" `
   -OutFile $templateFilePathlocale `
   -UseBasicParsing `
   -Headers @{"Cache-Control"="no-cache"}


   Invoke-WebRequest `
   -Uri "https://raw.githubusercontent.com/andrew-s-taylor/winget/main/manifests/g/Google/Chrome/92.0.4515.107/Google.Chrome.yaml" `
   -OutFile $templateFilePathversion `
   -UseBasicParsing `
   -Headers @{"Cache-Control"="no-cache"}
Finally, install them. Note, as it is a multi-file manifest, the path is the containing folder which is why it’s best to download each into their own folder. With a single file manifest, you can specify the manifest file, but I find it’s easier to use the folder to keep things the same
winget install --silent --manifest $pathOr to run in the system context, create a variable for Winget to the AppInstallerCLI and use that
   $Winget = Get-ChildItem -Path (Join-Path -Path (Join-Path -Path $env:ProgramFiles -ChildPath "WindowsApps") -ChildPath "Microsoft.DesktopAppInstaller*_x64*\winget.exe")

   &$winget install --silent  --manifest $templateFilePath
The next thing we can do is use Proactive Remediations to keep your apps up to date:
Again, scripts are both on github:
https://github.com/andrew-s-taylor/public/blob/main/Powershell%20Scripts/winget-update-check.ps1
https://github.com/andrew-s-taylor/public/blob/main/Powershell%20Scripts/winget-upgrade.ps1
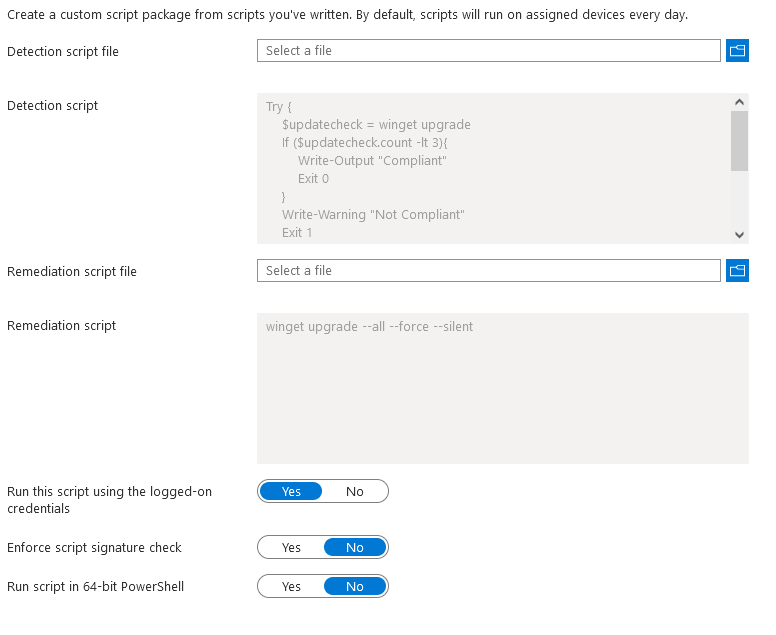
Winget at present isn’t the most powershell friendly so the check is simply counting the number of lines returned, anything 3 or less means no updates
Try {
    $updatecheck = winget upgrade
    If ($updatecheck.count -lt 3){
        Write-Output "Compliant"
        Exit 0
    }
    Write-Warning "Not Compliant"
    Exit 1
}
Catch {
    Write-Warning "Not Compliant"
    Exit 1
}
Update: Using the system context:
Try {
    $Winget = Get-ChildItem -Path (Join-Path -Path (Join-Path -Path $env:ProgramFiles -ChildPath "WindowsApps") -ChildPath "Microsoft.DesktopAppInstaller*_x64*\Winget.exe")

    $updatecheck = &$winget upgrade
    If ($updatecheck.count -lt 3){
        Write-Output "Compliant"
        Exit 0
    }
    Write-Warning "Not Compliant"
    Exit 1
}
Catch {
    Write-Warning "Not Compliant"
    Exit 1
}
Then upgrade:
winget upgrade --all --force --silentUpdate: System Context:
$Winget = Get-ChildItem -Path (Join-Path -Path (Join-Path -Path $env:ProgramFiles -ChildPath "WindowsApps") -ChildPath "Microsoft.DesktopAppInstaller*_x64*\Winget.exe")

&$winget upgrade --all --force --silent
Note 1: I haven’t yet found a way to exclude an application from an -all upgrade which is slightly annoying because I’d prefer office updates to be handled via Intune directly. If anyone has found a way, let me know in the comments!
Note 2 – WHEN NOT USING NEW SYSTEM CONTEXT: When adding to Intune, make sure to select Run in the logged-in credentials or the scripts will fail:
That’s it, run at whatever schedule suits you and let the apps update themselves. Remember if it’s a custom app with a custom manifest, you’ll need to update the manifest file version too.
I’ll add a post on a custom repo once it’s a bit more user friendly
I have a use case of using the mainfest option to create a list of apps, then after a replacement windows machine is obtained by the user, using a differences script to compare the two manifests, then create an install script for the missing app packages off these differences, however I am concerned with the community repo where our proprietary software could be exposed. Is there any security anyone has discovered surround access to this repo? or can a cert based access or other secure methods be used?
There are private repos planned for Winget, you can set them up now, but it’s not an easy process.
If you wanted to just use a custom manifest, you could store the manifest either in a private repo and download it passing a token, or in an Azure blob and download with the SAS string
Then you could do the same with the executables, store in a repo and download and install with the SAS (I think it should work this way, I’ve never tried it myself though)
how you create the manifests files ?
When running the upgrade all in system context script locally on a machine that has winget I get the error message
The expression after ‘&’ in a pipeline element produced an object that was not valid. It must result in a command
name, a script block, or a CommandInfo object.
I may missing something?
You could try replacing the & with “start-process” and see if that works better
Hello and thanks for the article. The problem is often not the first installation of the software but the update. how can i ensure that an update / upgrade is checked every day. at the end it says how to do it but where can i find the option where the script is run once a day?
You have a few options for this one:
1) You can push out a scheduled task using a powershell script within Intune
2) Use Pro-Active Remediation with custom detection and remediation scripts to run the updates on a schedule (Check example & remediate example )
If you are using the default repo, you can just use an “upgrade -all” command to do them all in one go.
If you are using a custom manifest, you’ll have to update each one manually, that could be with multiple remediation scripts, or you could do one script with some logic to check which apps are installed and update accordingly (something I might put together in a future post)
Hope this helps!