
I’m sure most of you are now either moving to or considering a switch to Windows 11 and want to configure the start menu the same as on Windows 10. I’m sure you’ve also noticed that the method to configure it has changed so the previous policies won’t be working.
In this post I’ll run through creating a policy for both Windows 10 and Windows 11 and then using an Applicability Rule to only apply the policy to the appropriate OS.
Windows 10
Starting with Windows 10, I’m sure everyone has this policy by now, but just in case:
Create a new Device Restrictions Policy and select Start. Now you need to upload a custom XML file. You can follow the Microsoft guide here or just amend mine:
<LayoutModificationTemplate xmlns:defaultlayout="http://schemas.microsoft.com/Start/2014/FullDefaultLayout" xmlns:start="http://schemas.microsoft.com/Start/2014/StartLayout" Version="1" xmlns="http://schemas.microsoft.com/Start/2014/LayoutModification" xmlns:taskbar="http://schemas.microsoft.com/Start/2014/TaskbarLayout">
  <LayoutOptions StartTileGroupCellWidth="6" />
  <DefaultLayoutOverride LayoutCustomizationRestrictionType="OnlySpecifiedGroups">
    <StartLayoutCollection>
      <defaultlayout:StartLayout GroupCellWidth="6">
        <start:Group Name="">
          <start:DesktopApplicationTile Size="2x2" Column="4" Row="0" DesktopApplicationID="Microsoft.Office.EXCEL.EXE.15" />
          <start:DesktopApplicationTile Size="2x2" Column="2" Row="2" DesktopApplicationID="Microsoft.Office.POWERPNT.EXE.15" />
          <start:DesktopApplicationTile Size="2x2" Column="0" Row="4" DesktopApplicationID="MSEdge" />
          <start:DesktopApplicationTile Size="2x2" Column="0" Row="0" DesktopApplicationID="Microsoft.Office.OUTLOOK.EXE.15" />
          <start:DesktopApplicationTile Size="2x2" Column="2" Row="4" DesktopApplicationID="Microsoft.Office.ONENOTE.EXE.15" />
          <start:DesktopApplicationTile Size="2x2" Column="4" Row="4" DesktopApplicationID="com.squirrel.Teams.Teams" />
          <start:DesktopApplicationTile Size="2x2" Column="2" Row="0" DesktopApplicationID="Microsoft.Office.WINWORD.EXE.15" />
          <start:Tile Size="2x2" Column="0" Row="2" AppUserModelID="Microsoft.CompanyPortal_8wekyb3d8bbwe!App" />
          <start:Tile Size="2x2" Column="4" Row="2" AppUserModelID="Microsoft.WindowsStore_8wekyb3d8bbwe!App" />
        </start:Group>
      </defaultlayout:StartLayout>
    </StartLayoutCollection>
	</DefaultLayoutOverride>
    <CustomTaskbarLayoutCollection PinListPlacement="Replace">
      <defaultlayout:TaskbarLayout>
        <taskbar:TaskbarPinList>
   <taskbar:DesktopApp DesktopApplicationID="Microsoft.Windows.Explorer"/>
	<taskbar:DesktopApp DesktopApplicationID="Microsoft.Office.OUTLOOK.EXE.15"/>
	<taskbar:DesktopApp DesktopApplicationID="MSEdge"/>
        </taskbar:TaskbarPinList>
      </defaultlayout:TaskbarLayout>
    </CustomTaskbarLayoutCollection>
</LayoutModificationTemplate>
When assigning the policy we need to select an Applicability Rule:

This will only apply the policy if the OS version is Windows 10
Windows 11
Windows 11 is currently configured via a Custom OMA-URI policy (I imagine it will switch to Settings Catalog at some point) and is configured via JSON
First up, create your custom policy with these details:
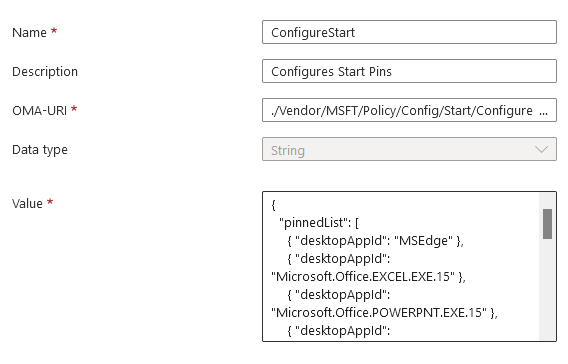
The OMA-URI is:
./Vendor/MSFT/Policy/Config/Start/ConfigureStartPinsMy JSON is as follows:
{
  "pinnedList": [
    { "desktopAppId": "MSEdge" },
    { "desktopAppId": "Microsoft.Office.EXCEL.EXE.15" },
    { "desktopAppId": "Microsoft.Office.POWERPNT.EXE.15" },
    { "desktopAppId": "Microsoft.Office.OUTLOOK.EXE.15" },
    { "desktopAppId": "Microsoft.Office.ONENOTE.EXE.15" },
    { "desktopAppId": "Microsoft.Office.com.squirrel.Teams.Teams" },
    { "desktopAppId": "Microsoft.CompanyPortal_8wekyb3d8bbwe!App" },
    { "desktopAppId": "Microsoft.Office.WINWORD.EXE.15" },
    { "packagedAppId": "Microsoft.WindowsStore_8wekyb3d8bbwe!App" },
    { "desktopAppId":  "Microsoft.Windows.Explorer" }
  ]
}
It is pinning the same apps as on Windows 10, Office suite, Teams, company portal, Store and Windows Explorer (I just find it easier to read in JSON)
That’s it for the config, now we just need the Applicability Rule:

As Windows 11 is still very much being updated, you need to keep on top of these versions (the Microsoft official list is here) or you may find newer machines not picking up the config
I hope this is of use, feel free to add any comments below!
Great Post, one question which is probably generic to using custom OMA-URI policies. I trialled this using the user setting, deploying just to myself, once happy I made one last change set it to the device setting and deployed out to all devices, this worked fine for everyone except me! Looking in the Registry I have the setting deployed in the device node, but the older setting remains in user node under my SID and the user setting overrides the machine one. So, it has tattooed the registry, under both current and providers. If I login on a ‘clean’ machine then I get the device settings. If there a way to ‘clear’ setting when a policy is removed?
Hi, some Intune settings still tattoo so when you change them to non configured, Intune just ignores it because it’s not configured, which leaves the setting on the device. The only way to clear, is to set another policy reverting the change (setting registry from 1 to 0 for example)
I had a hint from some lovely microsoft engineer and created a W32 app that sent the following registry using powershell: cleared all the junk clickbait and allowed users to pin stuff they needed afterwards.
—————————————————
Windows Registry Editor Version 5.00
[HKEY_LOCAL_MACHINE\SOFTWARE\Microsoft\PolicyManager]
[HKEY_LOCAL_MACHINE\SOFTWARE\Microsoft\PolicyManager\current]
[HKEY_LOCAL_MACHINE\SOFTWARE\Microsoft\PolicyManager\current\device]
[HKEY_LOCAL_MACHINE\SOFTWARE\Microsoft\PolicyManager\current\device\Start]
“ConfigureStartPins”=”{ \”pinnedList\”: [ { \”desktopAppId\”: \”MSEdge\” }, { \”desktopAppId\”: \”Microsoft.Office.OUTLOOK.EXE.15\” }, { \”desktopAppId\”: \”Microsoft.Office.WINWORD.EXE.15\” }, { \”desktopAppId\”: \”Microsoft.Office.EXCEL.EXE.15\” }, { \”desktopAppId\”: \”Microsoft.Office.POWERPNT.EXE.15\” }, { \”desktopAppId\”: \”Microsoft.WindowsCalculator_8wekyb3d8bbwe!App\” }, { \”desktopAppId\”: \”Microsoft.Windows.Explorer\” }, { \”desktopAppId\”: \”com.squirrel.Teams.Teams\” } ] }”
“ConfigureStartPins_ProviderSet”=dword:00000001
“ConfigureStartPins_WinningProvider”=”B5292708-1619-419B-9923-E5D9F3925E71”
[HKEY_LOCAL_MACHINE\SOFTWARE\Microsoft\PolicyManager\providers]
[HKEY_LOCAL_MACHINE\SOFTWARE\Microsoft\PolicyManager\providers\B5292708-1619-419B-9923-E5D9F3925E71]
[HKEY_LOCAL_MACHINE\SOFTWARE\Microsoft\PolicyManager\providers\B5292708-1619-419B-9923-E5D9F3925E71\default]
[HKEY_LOCAL_MACHINE\SOFTWARE\Microsoft\PolicyManager\providers\B5292708-1619-419B-9923-E5D9F3925E71\default\Device]
[HKEY_LOCAL_MACHINE\SOFTWARE\Microsoft\PolicyManager\providers\B5292708-1619-419B-9923-E5D9F3925E71\default\Device\Start]
“ConfigureStartPins”=”{ \”pinnedList\”: [ { \”desktopAppId\”: \”MSEdge\” }, { \”desktopAppId\”: \”Microsoft.Office.OUTLOOK.EXE.15\” }, { \”desktopAppId\”: \”Microsoft.Office.WINWORD.EXE.15\” }, { \”desktopAppId\”: \”Microsoft.Office.EXCEL.EXE.15\” }, { \”desktopAppId\”: \”Microsoft.Office.POWERPNT.EXE.15\” }, { \”desktopAppId\”: \”Microsoft.WindowsCalculator_8wekyb3d8bbwe!App\” }, { \”desktopAppId\”: \”Microsoft.Windows.Explorer\” }, { \”desktopAppId\”: \”com.squirrel.Teams.Teams\” } ] }”
“ConfigureStartPins_LastWrite”=dword:00000001
That’s a useful one, thank you!
Hi Andrew,
The profile is successfully pushed to windows 11 but the start menu didn’t change. I used in-place upgrade to upgrade the device from win 10 to win 11.
{
“pinnedList”:[
{ “desktopAppId”: “MSEdge” },
{ “desktopAppId”: “Chrome” },
{ “desktopAppId”: “Microsoft.Office.WINWORD.EXE.15” },
{ “desktopAppId”: “Microsoft.Office.EXCEL.EXE.15” },
{ “desktopAppId”: “Microsoft.Office.POWERPNT.EXE.15” },
{“packagedAppId”:”Microsoft.MicrosoftOfficeHub_8wekyb3d8bbwe!Microsoft.MicrosoftOfficeHub”},
{ “desktopAppId”: “Microsoft.Office.com.squirrel.Teams.Teams” },
{ “desktopAppId”: “Microsoft.SkyDrive.Desktop” },
{ “desktopAppId”: “Microsoft.Office.ONENOTE.EXE.15” },
{ “desktopAppId”: “Microsoft.CompanyPortal_8wekyb3d8bbwe!App” },
{ “packagedAppId”: “desktopAppId”:”Microsoft.Windows.Explorer” },
{“packagedAppId”:”windows.immersivecontrolpanel_cw5n1h2txyewy!microsoft.windows.immersivecontrolpanel”}
]
}
Hi Mohammad,
It looks like I had a fault in my JSON, this line:
{ “packagedAppId”: “desktopAppId”:”Microsoft.Windows.Explorer” },
Should be:
{ “desktopAppID”: “Microsoft.Windows.Explorer” },
I have updated the post now to reflect the fix as well